
Corona 9 in 3ds Max | Rendering Settings
- Margarita Nikita

- May 1, 2023
- 8 min read
Updated: Nov 19, 2024
In this article we will explore the renderings settings we can apply when using the Corona Renderer. You can also see my YouTube video on the Rendering Settings.
To access the rendering settings press F10 or click the Render Setup button.

Although 3ds Max and Corona have several rollouts with commands, you should not feel overwhelmed by all the settings. Corona is really easy to setup and from all the settings we see in the Render Setup window, I will explain only those that I believe are vital to control the quality of your images and the rendering time.
Assign Corona
To use Corona, we must first select it as our renderer.
At the top of the Render Setup window, make sure Production Rendering Mode is selected as the Target and then choose Corona in the Renderer dropdown list.

If you only use Corona as a rendering engine in all your projects, then you can set it as your default renderer to avoid repeating this step every time you start a new project. To do so, scroll down and open the Assign Renderer rollout. Make sure that next to Production, Corona is selected and click on Save as Defaults.

Frame Buffer
To produce a render, choose one of the following options:
1. Go to the menu Rendering and choose Render
2. Click the Render Production button from the Main Toolbar or
3. Press Shift and Q
Frame Buffer displays the rendering progress and gives us full control over the rendered output. It allows us to review, post process and save the render.
When the rendering process starts, two windows appear in our screen – Frame buffer, and the Rendering window.

The Rendering window shows the progress of the render. More specifically, next to the Current Task we see a timer that shows the rendering time in real-time. Below the Current Task is a progress bar that displays a green color that serves as a visual aid of the progress of the render. Once the render is completed, the Rendering window disappears.
There are two buttons in the Rendering window, Stop and Cancel and they are both used to abort the rendering process.

The progress of the render can also be viewed, if we go to the Stas tab and the TIMES section.

The Frame Buffer window consists of the main view where the render unfolds and the side panel that consists of 5 tabs.
Post
The Post tab allows us to fine tune the render directly in the Frame Buffer window without the need of other software, like Photoshop.
Some of the most useful settings here are the following:
TONE MAPPING
Simple Exposure
Use the Simple Exposure to control the brightness of the image. The more we increase this value, the brighter the image gets. While the lower we set it, the darker the render.
We can either type the desired number or use the arrows to set the exposure. In this example, I have increased the Simple Exposure to make the render brighter.

White Balance
White balance is a photographic term and refers to the process of removing any color cast or tint from our photos. If all the lights that we are using have a white color, then we probably won’t need to adjust the White Balance. But if we use warm lighting, let's say 3500K, like what I usually do in my renders, then we need to adjust the White Balance, otherwise it will look like there is an orange filter on our render.
How does White Balance work in Corona? The lower we go the colder the render gets, while the higher we go the warmer it becomes. In our example, if I set the White balance to 5500K, the render gets more desaturated and we no longer have the orange tint.
There is not a right or wrong value, it all depends on the atmosphere you want your render to have.

Contrast
Contrast is the ratio between the white and the black, or in other words, the light and the dark parts of a scene. I like my renders to have contrast, since it makes everything pop up. I usually set it between 2 or 3. There is not a right or wrong value here, you can also keep it 1.

Saturation
I usually use Saturation to make my render grey-er. Don’t overdo it. Just a tad, let’s say it’s a complementary setting to the White Balance.
Apart from the settings we see in the Tone Mapping rollout, we can click on the + button and add more. One setting that you may need is the Highlight Control.
Highlight Compress
Do you see the parts of the image where the sun hits the surfaces?
Highlight compression controls how these parts look, the highlights of the render. The higher we go the less intense the bright areas of the render will be and will have less contrast, while the lower we go, the brighter they will look, getting overexposured. So, if instead of 1, we set it to 5, the highlights will look kind of dull, while if we set it to 0.7, they get much more intense.


LUT
Corona provides a large list of ready-made LUTs allowing us to quickly change the look of our image. It's like let’s say applying a filter to our render. Select LUT and enable it. The render will get automatically warmer, and kind of yellower. Click on the arrow to see the settings.

The Opacity allows us to control the strength of the effect. So, if I make it 0.5 it’s more subtle now. From the drop-down list you can explore the various LUTs and choose the look you prefer.

Next to the TONE MAPPING rollout, there is a checkbox. If I disable it, we can see how our render looked before applying the tone mapping settings.
BLOOM AND GLARE
Enable BLOOM AND GLARE and you will see the effect automatically added to all the lights of the scene.
In my scene for now, the only light I have is the sunlight – I don’t have yet any artificial lights. So, you can see over the window the haze added.

If I make the Bloom intensity 15 you can see how stronger the effect got.

The Glare effect is when you see a star effect on the lights. We will see this later on once we add the artificial lighting in the scene.
SHARPENING/BLURRING
Another effect I like to use in my renders is the Sharpening. I will enable it and open the rollout. I usually set the Sharpen amount to 2 and also set the Blur radius to 0.5, to make my render look sharper, more defined.

DENOISING
Moving forward to the DENOISING rollout, if I try to enable it, I can’t. It informs us here that to use Denoising, we must first enable it from the Scene tab.
Press F10 to open the Render Setup window. Go to the Scene tab and to the Denoising section.
Denoising will be added at the end of the rendering process, and it will smartly blur the image to reduce the noise present.
The default option is None and if we keep it, we need to allow the render to calculate for a long time to be noise-free. While if we select Corona High Quality and re-render, now it gets enabled in the Frame Buffer and our render will look smoother at the end, by getting blurred out from the Denoising method.

The more time we allow the scene to render, the cleaner the image we get.
Stats
In the Stats tab we see general statistics of the scene, like the times needed to render or the noise of the scene or the number of polygons and so on. I mainly use this tab to check where the noise level of the scene is to decide when to stop the render. We will see this more thoroughly later.
LightMix
A really cool feature I always use is LightMix. First, we need to go to the Render Setup window, so press F10 and go to the Scene tab.
Click on the Setup LightMix button in the General Settings rollout. Personally, I keep the default settings here, which is the option Instanced Lights and click the Generate button.


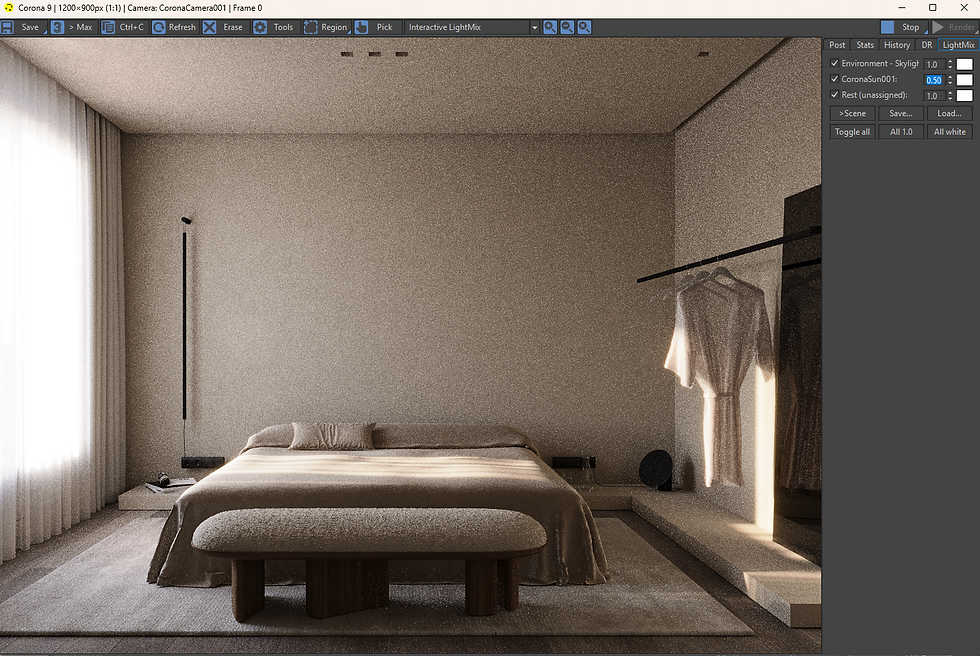
If we now render and go to the LightMix tab in the Frame Buffer window, you will see a list of all the lights we have in the scene. For now we have 2 lights – the light from the sun, CoronaSun, and the light from the environment, Environment – Skylight.
What we can do from this tab is to turn on and off lights. If I disable the CoronaSun001, you see below the result we get from the Environment light.

We can also adjust the intensity of a light. Let me enable again the sun and make it 0.5. Now, we have a softer sunlight entering the room.
Moreover, we can click on the color field and change the color of the light.
So, LightMix allows us to play with the lights of the scene and create different lighting scenarios.
Corona keeps all this information saved, so if we close the Frame Buffer window, and hit the render button again, all this info will re-apply to the next render.
Setting the Rendering time and Noise level
Go to the Render Setup window, to the Scene tab and to the General Settings rollout.
In the Progressive Rendering Limits section, we can set the rendering time and the noise level.
As its name denotes, in the Time limit fields we set the rendering time. So, if I set 5 minutes, the scene will render for 5 minutes and then it will stop no matter the noise level at that point. While in the Noise level limit field, we set the desired noise level. A good range of values to set here so that our render is clean is between 2-4.
The lower we set it the cleaner the image we get, but at the same time the longer it needs to be calculated. Personally, I set the Noise level to 3%, maybe 2.5%, but if you go to 2.5 keep in mind that you need to have hours ahead of you to leave it render.

The software will render the scene until one of the two reaches its limit first. So, if for instance we set 5 minutes and a Noise level of 3% and press Render. The scene will render for 5 minutes and then it will stop although the Noise level limit is not 3%, but much higher.
To see what the Noise level of our render is, go to the Stats tab in the Frame Buffer window.
In the Performance section we see that the target is 3% and next to it, is the current noise level. And we can see that for the 5 minutes rendering time that we set, the noise level is approx. 8%. And the render stopped after 5 minutes, although it didn’t reach the goal of 3%.

Personally, when I do my test renders, I set the Time limit to 5-10 minutes and I’m not interested in the Noise level. This way the scene will render for 5 -10 minutes and then it will stop rendering no matter the noise level at that point.
Once I have finalized my scene and I’m ready to render the final image, I will set the Time limit to 0 and I will go to the Noise level limit and set it to 3%. This way I will get a clean image.
Summary
To sum up, I set the Noise level limit to 3%. For my draft renders, I set the Time limit to 5 minutes, while for my final renders I will set the Time to 0.
I enable LightMix by clicking on the Setup LightMix button and I choose Corona High Quality as the Denoising method.
While the image is being rendered or after it is produced, I always adjust the image from the Post tab and from the LightMix tab.
Thanks for reading, see you in my next post!


Comments